Mask tracking
Step-by-step tutorial on how to integrate custom video object segmentation neural network into Supervisely platform on the example of XMem.
Last updated
Was this helpful?
Step-by-step tutorial on how to integrate custom video object segmentation neural network into Supervisely platform on the example of XMem.
Last updated
Was this helpful?
In this tutorial you will learn how to integrate your video object segmentation model into Supervisely Ecosystem. Supervisely Python SDK allows to integrate models for numerous video object tracking tasks, such as tracking of bounding boxes, masks, keypoints, polylines, etc. This tutorial takes XMem video object segmentation model as an example and provides a complete instruction to integrate it as an application into Supervisely Ecosystem. You can find and try XMem Supervisely integration .
To integrate your custom video object segmentation model, you need to subclass sly.nn.inference.MaskTracking and implement 2 methods:
load_on_device method for loading the weights and initializing the model on a specific device. Takes a model_dir argument, which is a directory for all model files (like configs, weights, etc.), and a device argument - a torch.device like cuda:0, cpu.
predict method for model inference. It takes a frames argument - a list of numpy arrays, which represents a set of video frames, and an input_mask agrument - a mask with the objects in the first frame of the video. These objects will be tracked on all input frames. It should be a numpy array of shape (H, W), where 0 values represent the background, and other numbers represent the target objects (for example, if you have 2 target objects, than input_mask array will consist of 0, 1 and 2 values).
The overall structure of the class we will implement looks like this:
The superclass has a serve method. For running the code on the Supervisely platform, serve method should be executed:
The serve method deploys your model as a REST API service on the Supervisely platform. It means that other applications are able to send requests to your model and get predictions from it.
Now let's implement the class specifically for XMem.
Step 3. Download model weights.
Step 4. Open the repository directory in Visual Studio Code.
Creating necessary files and directories
We will also create requirements.txt file, where all app dependencies will be stored:
Now we can start coding our main.py file.
Defining imports and global variables
1. load_on_device
The following code creates XMem model with default hyperparameters recommended by original repository and defines resolution to which input video will be resized (we will use 480 as in original work). Also load_on_device will keep the model as a self.model and the device as self.device for further use:
2. predict
The core method for model inference. Here we are disabling gradient calculation, resizing input mask and frames via interpolation, inference XMem model frame-by-frame, saving postprocessed predictions to a list and updating progress bar on every iteration.
The method must return a list of numpy arrays with a length equal to the number of input frames. Each array is a predicted mask of shape (H, W), which represents the objects in one frame. In other words it should have format similar to the input_mask. For instance, if you're tracking two objects over 20 frames, your input frames variable will be a list of 20 numpy arrays, the input_mask will be a numpy array with shape (H, W), containing values of 0, 1, and 2. Similarly, the results variable will contain a list of 20 numpy arrays, with each individual array also shaped (H, W) and filled with 0, 1, and 2 values.
In the end of each iteration we update a progress bar via self.video_interface._notify(task="mask tracking") - it is necessary for app UI to look correctly:
When load_on_device and predict methods are implemented, it is necessary to initialize our model class and execute serve method:
Once the code is written, it's time to test it right in the Supervisely platform as a debugging app.
First of all it is necessary to create .vscode folder and launch.json file inside this folder. Your launch.json file should contain the following:
After that:
If you develop in a Docker container, you should run the container with --cap_add=NET_ADMIN option.
Install sudo apt-get install wireguard iproute2 or brew install wireguard-tools for Mac.
Define your TEAM_ID in the debug.env file. *Actually there are other env variables that is needed, but they are already provided in ./vscode/launch.json for you.
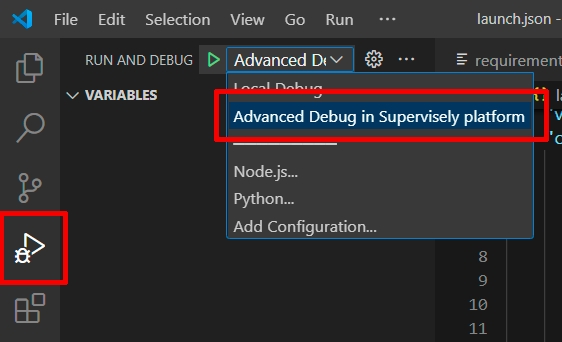
Switch the launch.json config to the Advanced debug in Supervisely platform:
Run the code.
✅ It will deploy the model in the Supervisely platform as a REST API.
Here is how advanced debug mode launch looks like:
After advanced debug launch you must be able to debug your app via Develop & Debug app:
Explanation:
supervisely_integration/serve/src/main.py - main inference script
supervisely_integration/serve/README.md - readme of your application, it is the main page of an application in Ecosystem with some images, videos, and how-to-use guides
supervisely_integration/serve/config.json - configuration of the Supervisely application, which defines the name and description of the app, its context menu, icon, poster, and running settings
supervisely_integration/serve/requirements.txt - all packages needed for debugging
supervisely_integration/serve/debug.env - file with variables used for debugging
supervisely_integration/docker - directory with the custom Dockerfile for this application and the script that builds it and publishes it to the docker registry
Here is the explanation for the fields:
type - type of the module in Supervisely Ecosystem
version - version of Supervisely App Engine. Just keep it by default
name - the name of the application
description - the description of the application
categories - these tags are used to place the application in the correct category in Ecosystem.
session_tags - these tags will be assigned to every running session of the application. They can be used by other apps to find and filter all running sessions
need_gpu: true - should be true if you want to use any cuda devices
gpu: required - app can be runned on both CPU and GPU devices, but it is recommended to use GPU for higher inference speed
community_agent: false - this means that this app can not be run on the agents started by Supervisely team, so users have to connect their own computers and run the app only on their own agents. Only applicable in Community Edition. Enterprise customers use their private instances so they can ignore the current option
docker_image - Docker container will be started from the defined Docker image, github repository will be downloaded and mounted inside the container.
entrypoint - the command that starts our application in a container
port - port inside the container
headless: true means that the app has no User Interface
allowed_shapes - shapes can be tracked with this model. In Supervisely masks can be represented by bitmap and polygon geometries.
Once you've tested the code, it's time to release it into the platform. It can be released as an App that is shared with the all Supervisely community, or as your own private App.
Step 1. Prepare ~/supervisely.env file with credentials.
Step 2. Clone with source code and create .
After cloning original repo we will create supervisely_integration folder, where all code for integration will be stored. There will be 2 directories - docker (we will put our Dockerfile here) and serve (app directory). Inside serve directory we will create src subdirectory and put main.py file there. Inside serve folder we will also create debug.env file - it will contain your :
You can read more about advanced debug mode .
The structure of is the following:
App configuration is stored in config.json file. A detailed explanation of all possible fields is covered in this . Let's check the config for our current app:
Refer to for all releasing details. For a private app check also .